















Help center
Getting Started with Emails in Per Diem
A restaurant’s guide to the Emails in Per Diem dashboard (Dashboard → Marketing → Emails) — how to set it up and use it correctly
- Connect your sending domain. Emails from an unverified domain are more likely to land in spam. Verifying your own domain means customers see mail from you, not a generic address.
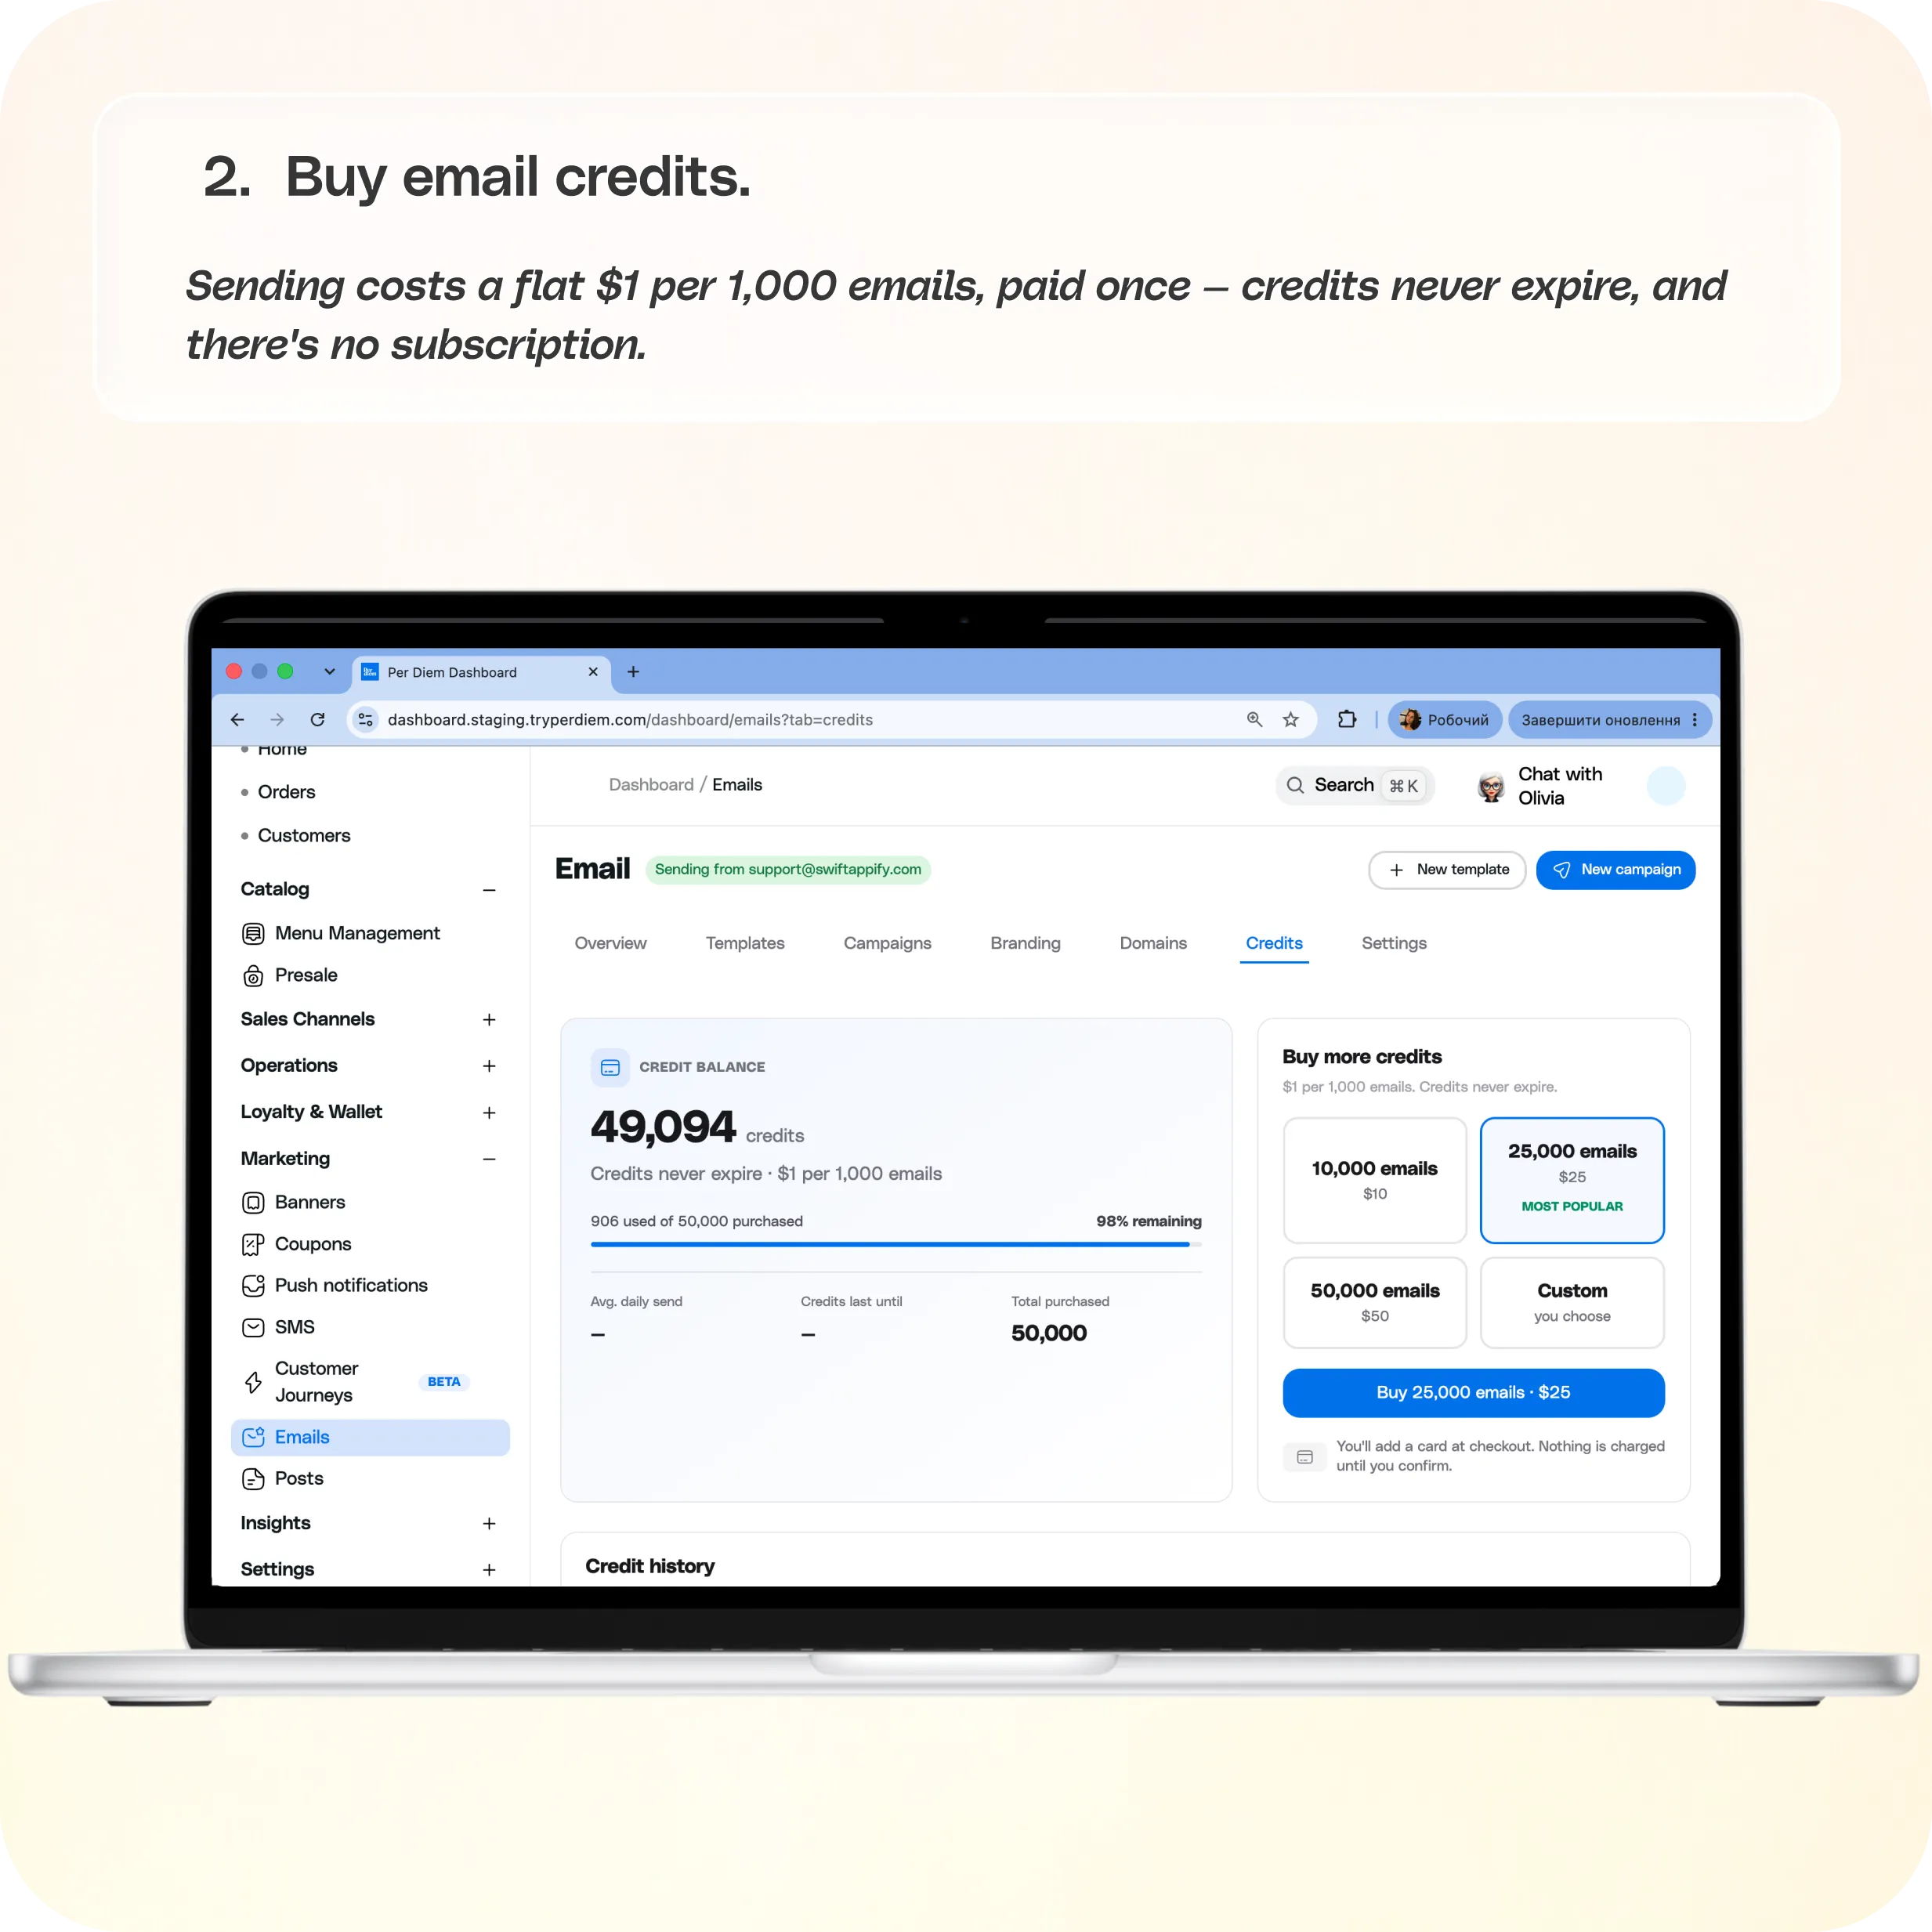
- Buy email credits. Sending costs a flat $1 per 1,000 emails, paid once — credits never expire, and there's no subscription.
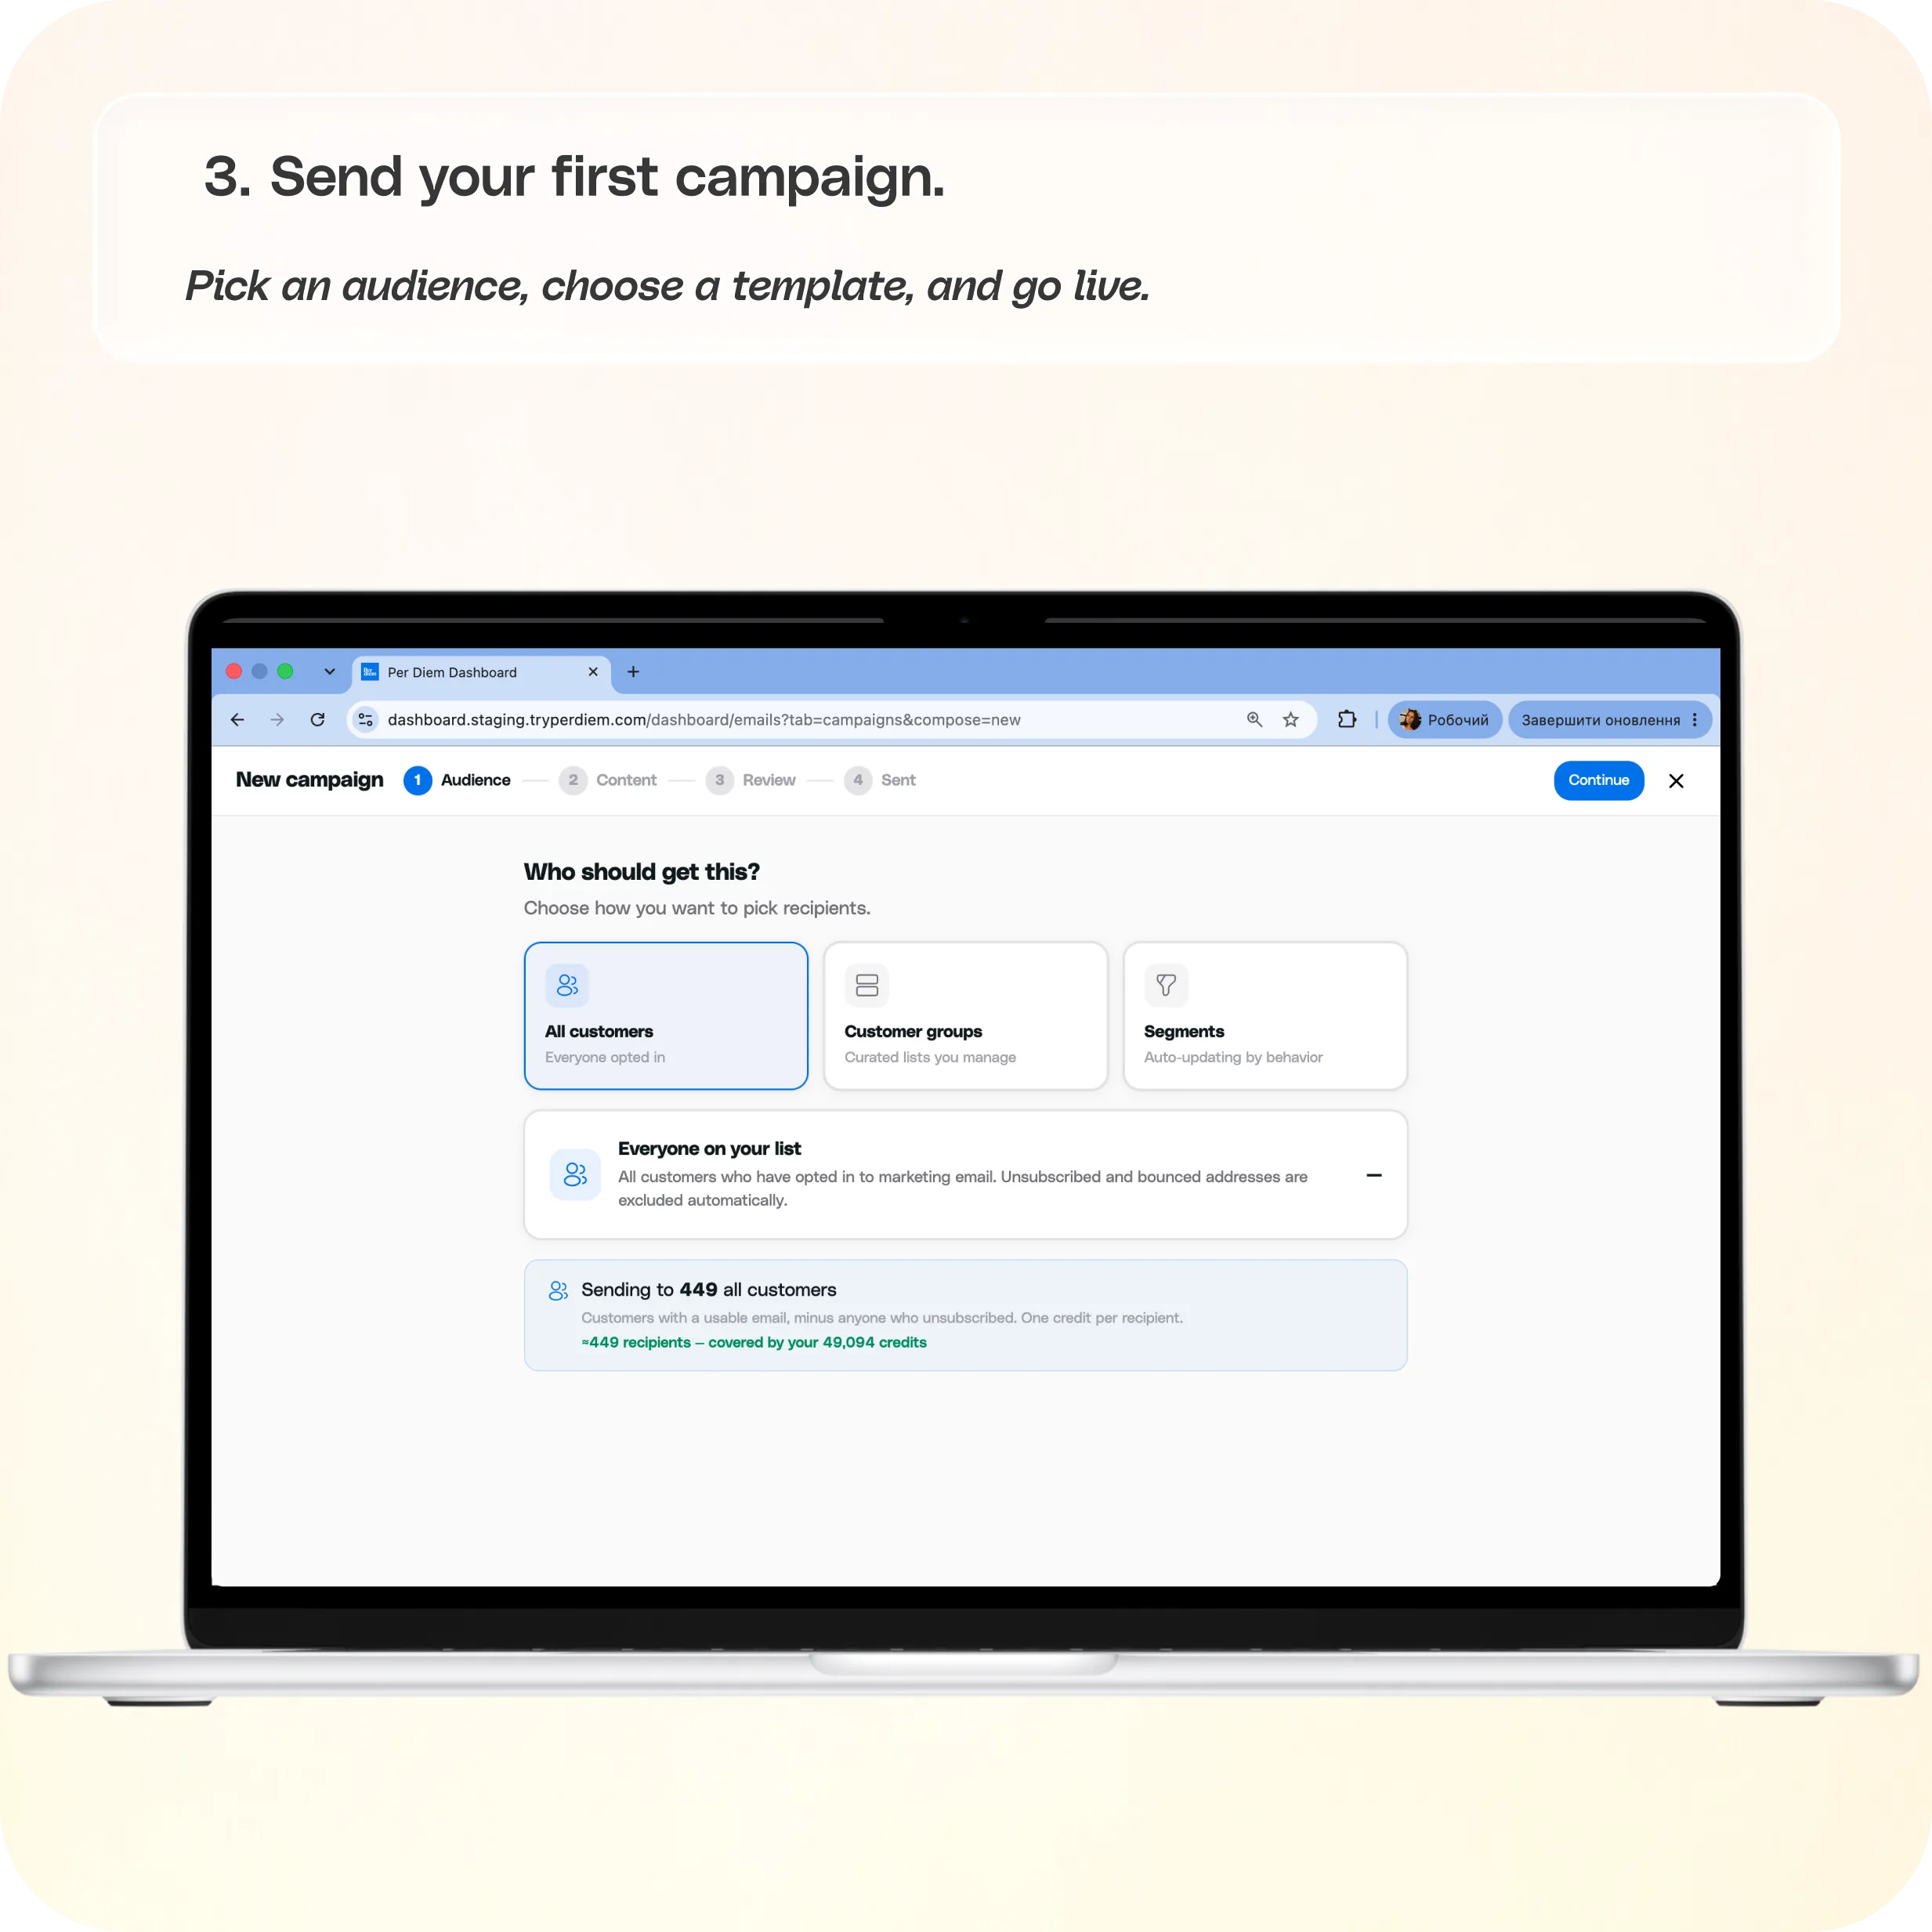
- Send your first campaign. Pick an audience, choose a template, and go live.
Steps 2 and 3 stay locked ("Waiting") until step 1 is done — so domain verification is always the first move.
Still require support?
Contact support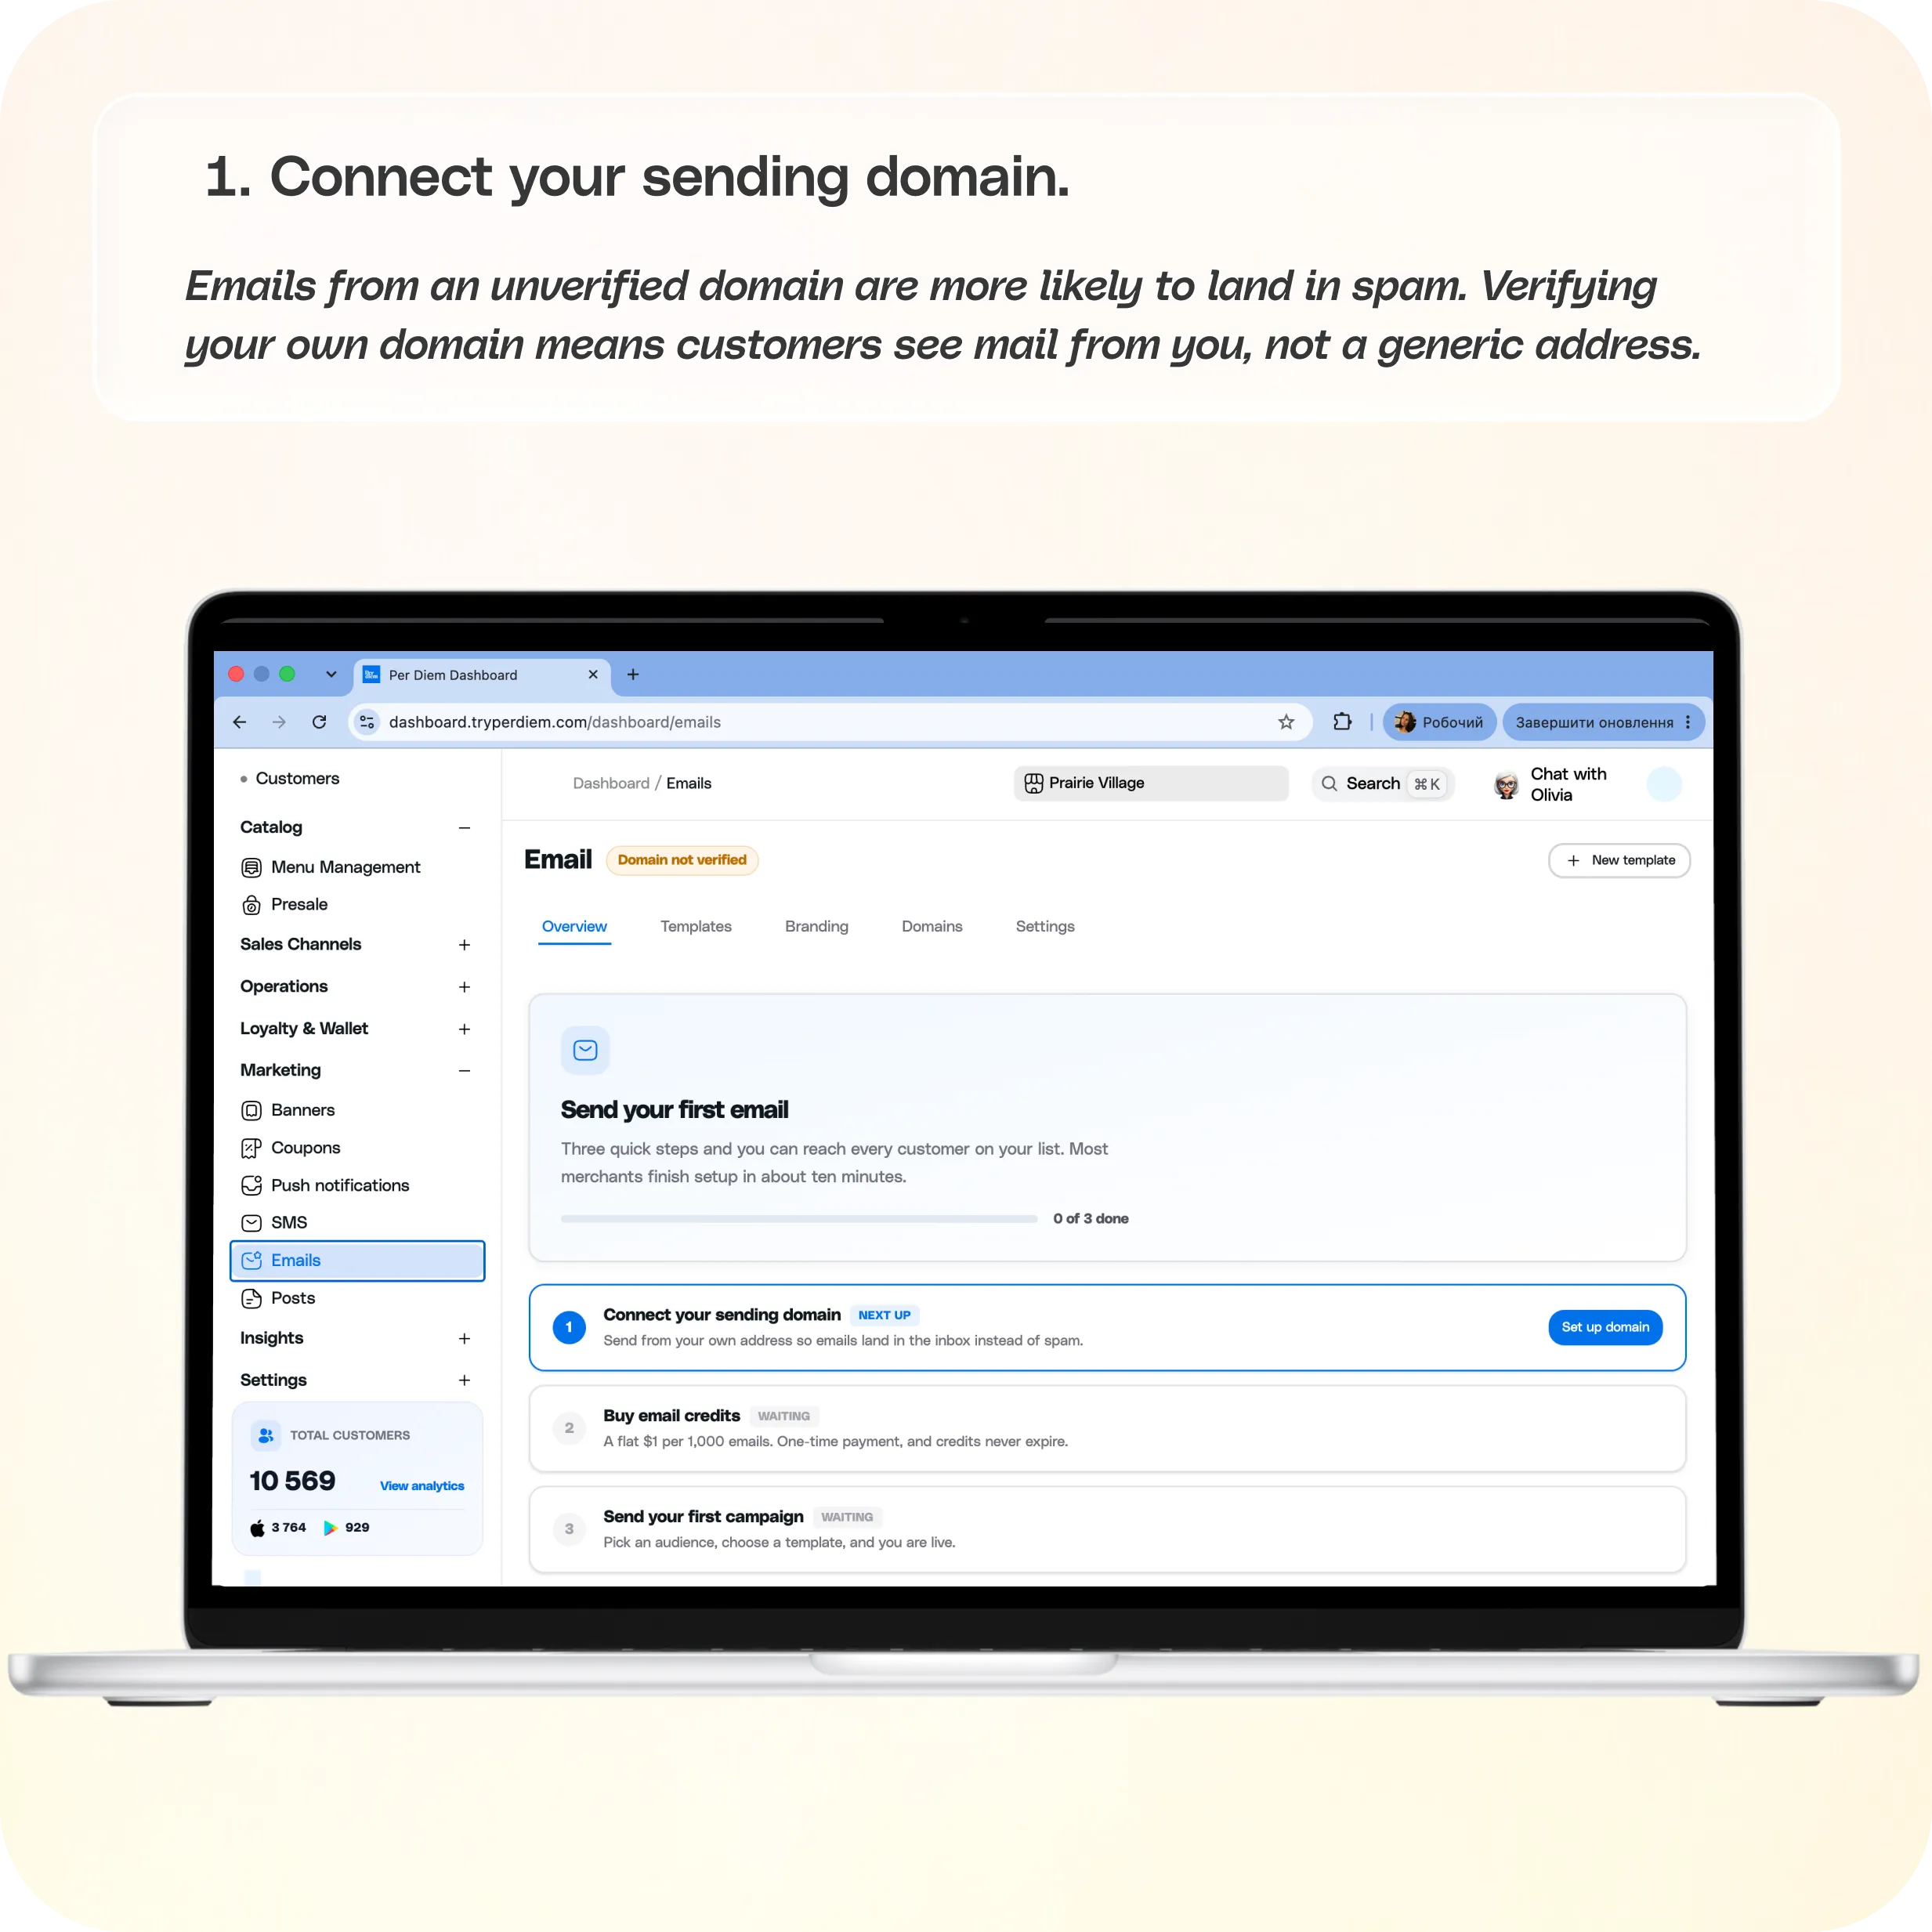
### **What is the Emails feature?**

Emails is your built-in email tool for two kinds of messages to customers:

* **System (transactional) emails** — automatic emails Per Diem already sends on your behalf when something happens, like a new order or a picked-up gift card. You can turn each one off or customize it.
* **Campaigns** — one-off or recurring marketing emails you design and send to a list of your customers (specials, promos, newsletters), built from reusable templates.

Everything lives under four tabs: **Overview, Templates, Branding, Domains,** and **Settings**.

### **Getting started: the 3-step setup**

The Overview tab walks every merchant through the same three steps before you can send a campaign. Most merchants finish in about ten minutes.

**1. Connect your sending domain.** Emails from an unverified domain are more likely to land in spam. Verifying your own domain means customers see mail from *you*, not a generic address.

**2. Buy email credits.** Sending costs a flat $1 per 1,000 emails, paid once — credits never expire, and there's no subscription.

**3. Send your first campaign.** Pick an audience, choose a template, and go live.

Steps 2 and 3 stay locked ("Waiting") until step 1 is done — so domain verification is always the first move.

#### **How do I connect my sending domain?**

Go to **Emails → Domains → Add domain**. A short 4-step wizard opens:

1. Enter the **domain** you want to send from (e.g. yourrestaurant.com), a **From name** (the display name customers see), a **From email** (e.g. [hello@yourdomain.com](mailto:hello@yourdomain.com)), and optionally a **Reply-to email** (e.g. [support@yourdomain.com](mailto:support@yourdomain.com)) if replies should go somewhere else.
2. Per Diem gives you DNS records to add at your domain registrar (this authenticates your domain — DKIM/SPF).
3. Verification runs against those records.
4. Once verified, the orange "Domain not verified" badge at the top of the Emails page clears, and the **Sender health** panel on Overview starts monitoring deliverability, DKIM, and SPF automatically.

You'll need access to your domain's DNS settings (through your domain registrar or IT/web team) to add these records.

#### **Why does everything point me toward verifying a domain first?**

Until your domain is verified, you can still explore the dashboard, edit email *subject lines*, and build templates — but full visual design editing, live previews, sending test emails, and buying credits/sending campaigns are all locked. It's the one prerequisite that unlocks the rest of the feature.

#### **How much do email credits cost, and do they expire?**

$1 per 1,000 emails sent, purchased as a one-time payment. Credits never expire, so you can buy a batch and use it over time — no recurring subscription fee for sending.

### **System emails (transactional)**

**Emails → Templates → System emails.** These are automatic emails tied to specific customer events — nothing needs to be scheduled or sent manually. They're grouped by category:

* **Orders & Fulfillment:** Order Confirmation, Order In Progress, Order Ready, Thanks For Picking Up Your Order, Order Delivery Confirmation, Reservation Request
* **Loyalty & Gift Cards:** Sent Gift Card, Gift Card Received, Store Credit Reload, Store Credit Added
* **Subscriptions & Account:** Welcome New Subscriber, Subscription Cancellation, Deactivated Account, Account Deletion

#### **Can I turn a system email off?**

Yes. Each one has a toggle. Turning an email off stops it from sending, but keeps its design saved — so you can switch it back on anytime without losing your customization.

#### **Can I customize what these emails say?**

You can always edit the **subject line** — insert variables like {store\_name}, {customer\_name}, and {location\_name} to personalize it. Editing the full email *design* (the body layout, images, copy) requires a verified sending domain first; until then you'll see a "Design customization needs a verified sending domain" notice with a shortcut to connect one.

### **Campaign templates ("My templates")**

**Emails → Templates → My templates.** These are reusable starting points for campaigns — saving one doesn't send anything.

#### **How do I build a template?**

Click **Design a new template** (or **+ New template** at the top of the page). You'll set:

* A **template name** (internal only — customers never see it)
* An optional **subject line**, with variables you can insert: customer\_first\_name, customer\_last\_name, store\_name
* **Content**, written as HTML in the built-in editor (you can also **Upload .html** if you already have a coded template) — a live **preview** updates as you type, showing sample values in place of variables
* An **"Include store footer"** toggle — when on, your branding footer (see below) is automatically appended

An unsubscribe link is always added automatically to every send, regardless of the footer setting, so you stay compliant no matter what.

#### **Do I need to know HTML to build a template?**

Currently the template editor is HTML-based — you write or paste the email's markup directly. If your team doesn't have someone comfortable with HTML, uploading a pre-built .html file (from a designer or an email-design tool) is the easiest path.

### **Branding: the email footer**

**Emails → Branding → Open builder.** This opens the Email Footer Builder — a drag-and-drop editor with a live preview of your email.

#### **What can I put in the footer?**

Four elements, added by clicking or dragging them into the preview:

* **Google Play download button**
* **Apple Store download button**
* **Website & social links**
* **Custom text**

#### **Does the footer apply to every email?**

Yes — it's a single footer used across *all* your outgoing email templates (system emails and campaigns that have "Include store footer" turned on). Changing it updates every template at once, so double-check before saving a change here.

### **Settings**

**Emails → Settings** consolidates what used to be a separate Emails settings page — nothing was removed, it just moved here.

* **Outgoing email settings:** turn on "I want to be blind-copied on all outgoing emails to customers" to BCC your own team on every customer email. Note: order receipt routing addresses only appear once order receipt emails are enabled under App features.
* **Low review alerts:** get emailed whenever a customer leaves a low rating, so you can follow up quickly.
* **Ask for a Google review on receipts:** turns on a customer-experience form inside the "order complete" email, for any location that has a Google Review URL configured — a lightweight way to collect more positive reviews. Use **Preview** to see it before saving.
* **Contact & support email:** controls where messages from the "Contact us" form in your mobile app land — set the primary address, optionally CC additional emails, and toggle whether the contact form even shows in your app.
Still have questions?Contact us
Ask anything or just say hi